PADDED SATIN STITCH
 

This is a more common variation of the flat Satin Stitch when embroidering on smooth or fine-weave fabric. The stitches can be worked slanted, if you want, as long as they are not in the same direction as the padding stitches.

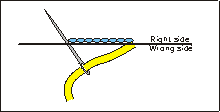
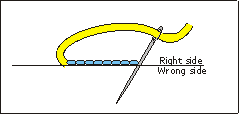
The first step in making this stitch is to outline the shape with the Outline Stitch. Then fill in the shape with Outline Stitch, keeping the stitching line perpendicular to the direction of the Satin Stitches. Last, stitch the Satin Stitches, starting at the middle of the shape and working outward.

The key qualities of a good Padded Satin Stitch are:
      • The shape's edges are clean and smooth
      • The stitches are even, parallel, and with no space between them
      • The surface of the stitching is smooth and satiny

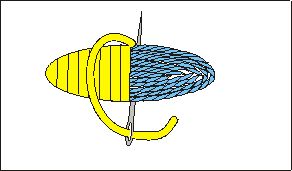
Note that in this drawing, the padding is shown in a different color for clarity. In reality, pad the shape with the same thread that you use for the Satin Stitches.


Hints:
  • Mark the shape clearly on the fabric with a fine washable marker or pencil.
  • Always stitch with good light, and use a magnifier if necessary
  • The shape's edges will be cleaner if you angle your needle so that the thread actually tucks under the outline stitching before going through the fabric. Here is a side view of this technique :

  • As you pull a stitch, control where it lies on the padding with your finger or thumb.
  • Always stitch with the fabric very tight in an embroidery hoop.
  • This stitch can be worked with a single strand of cotton floss, but it looks better when stitched with thread with less twist, such as floche.
  • The stitches should lie across the padding, not in the same direction.
  • Don't try to fill a shape that is too wide. If the Satin Stitches are too long, then they won't lie on the padding correctly. To fill a wide shape, either cut the shape in two (such as two halves of a leaf), or use the Long and Short Stitch to fill the shape.