|
CABLE STITCH
|
|
|
This stitch, along with the Trellis Stitch, is the most common
stitch used in English Smocking. It is well worth learning
to do it the right way.
The needle always enters and exits the pleat along the stitching
line, 1/4 - 1/3 of the way down into the pleat. Only stitch
through one pleat at a time - the stitch covers two pleats.
Pull the stitch taut by pulling to the left, and guide the
stitch to lie on the line with your finger or thumb.
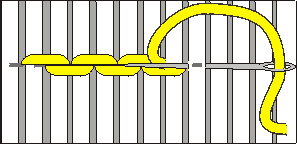
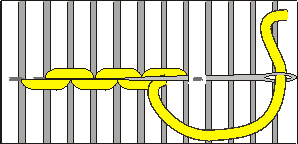
Smockers use the terms "Up Cable" and "Down Cable" to
refer to the position of the thread relative to the needle.
An "Up Cable" is really a single Outline Stitch, and a "Down Cable"
is a single Stem Stitch. |
|
|
"Up" Cable Stitch:
"Down" Cable Stitch:
 |
|
|
Hints:
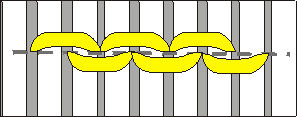
- As you pull the stitch tight, position the thread along
the stitching line with your finger or thumb. Also, pull
the thread to the left, not up or away from the fabric.
If you don't stitch this way, you are likely to end up
with a row of "U"s, looking like this :
Wrong :
- The Cable Stitch is usually worked with multiple strands
of thread. Take care that the threads do not become twisted
or braided. You want the strands to lie parallel on the
fabric, so that the strands form a flat ribbon.
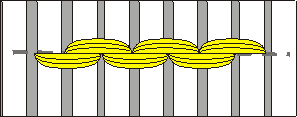
When the strands are not parallel, the effect of the stitch
is more like a string instead of a ribbon. The stitch
is not as pretty, and, because it is not as full, it does
not cover as well.
Wrong:
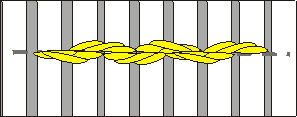
You can keep the strands flat and untwisted by stroking
the stitch with your thumb as you pull the stitch taut.
Every few stitches, inspect the unstitched thread and
separate and untwist the strands as necessary.
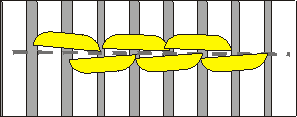
- It is important to keep the needle horizontal along
the stitching line. The stitches look like they lie above
and below the line, but that is due to the stitches pushing
each other up and down, not to the positioning of the
needle. If you angle the needle, or if you stitch above
or below the line, you will end up with a row like this
:
Wrong:
- To make the stitch look fuller, use more strands in
the needle.
- It's a common mistake for beginners to skip pleats,
or to stitch through two pleats when making the stitch.
Take care to use one new pleat per stitch.
- To start a row of Cable Stitches, bring the needle up
at the bottom of the valley between the first two pleats
of the row. Insert the needle through the first pleat,
from right to left. You're now in position to start the
first stitch.
- To end a row of Cable Stitches, finish the last stitch
as normal, with the thread coming out the left side of
the last pleat. Plunge the needle directly down into the
valley between the last two pleats. Tie off in the back.
|
|
|
Uses:
- Horizontal border
- Anchoring border for top and bottom of a smocked insert,
and for the top of a Bishop design. The Cable Stitch
is less elastic than the Trellis Stitch, and so it is a good
stitch to use to stabilize the flairing of the smocked
piece.
- Center stitch for Curved Smocking
- Turning stitch for Geometric Smocking.
- Backsmocking
- Picture Smocking
- Four-Cable Flowerette
- Six-Cable Flowerette
|
|
|
|
When smocking with ribbon, sew the Cable
Stitch the same way as with thread, but take care that the
ribbon does not become twisted.
|
|
|
Hints:
- Remove any twist from the ribbon before pulling the
stitch. It helps to support the stitch with a heavy needle
or stiletto. to keep the twist out.
- Use 2mm silk ribbon. Any wider, and it's too difficult
to stitch with (and the stitch doesn't look right, anyway).
Don't try to use satin ribbon, or some other kind of ribbon
that's heavy or stiff.
|
|
|
You can use the Cable Stitch to add beads
or seed pearls to your smocking. Simply string the bead
on the needle before making the stitch. The bead will
naturally nestle between the two pleats. This technique
is expecially lovely when stitching a Four-Cable Flowerette. Make
sure you use a needle small enough to pass through the
hole of the bead. |
|
|
|
|
|