FEATHER STITCH
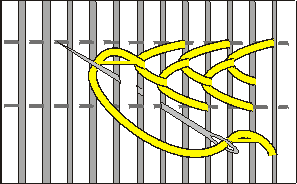
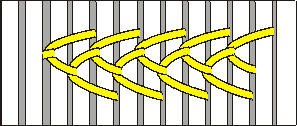
The Feather Stitch can be stitched on pleats for a lovely feathery effect. Unlike most smocking stitches, it is stitched from right to left.

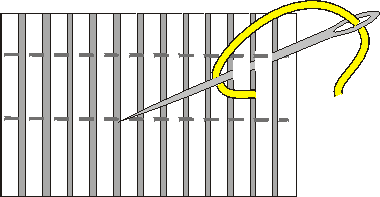
Bring your needle up on the left side of the first pleat, 2/3 of the way from one pleating row to the one below it. Stitch through the first 2 pleats, angling your needle from the top pleating row to 1/3 of the way down. Catch the thread 
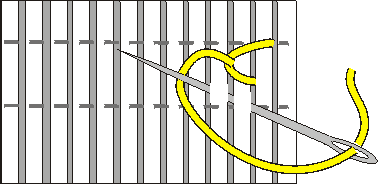
under the needle, to make a loop. For the second stitch, angle the needle upwards, stitching through the second and third pleats. Each stitch uses one old pleat and one new one.
First Stitch:


Second Stitch:


Finished Stitch:
 
Hints:
  • It's tempting to use two new pleats for each stitch, because the previous stitch's loop extends over a new pleat, making it look as if the pleat has already been used. Be careful to "back up" when you make each stitch, so that you stitch through one old and one new pleat.
  • When you need to end a row, take one tiny stitch to secure the last loop.
  • To end a thread and start a new one, you can tack the last loop, tie off on the back, and start the new thread just inside the last loop. A more elegant, but more time-consuming, method is to start the new thread in a new needle before making the last loop. Use the old needle to loop around the new thread, and tie off in the back. Then continue stitching with the new thread.
  • You can vary the tension and the width of the stitches to create different effects, just as in Feather Stitching on plain fabric.
 
See also: